English
 French
 German
 Lithuanian
 Polish
 Spanish
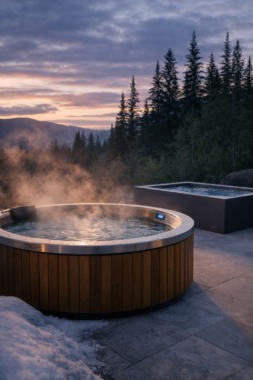
Winter’s harsh conditions can significantly impact outdoor saunas, potentially causing damage that shortens their lifespan and diminishes your sauna experience. Properly winterizing your outdoor sauna is essential for protecting your investment and ensuring it remains a sanctuary of warmth throughout the coldest months. Whether you own a barrel sauna tucked among snow-laden trees or a cabin-style structure beside your home, preparation is key to prevent costly repairs and maintain optimal performance.

Winterizing involves a comprehensive approach to protect your sauna from moisture intrusion, temperature fluctuations, and snow accumulation. This seasonal preparation ensures your sauna remains structurally sound while operating efficiently during the months when you’ll likely appreciate its warmth the most. Selecting the appropriate outdoor sauna for your regional climate conditions is the first step in ensuring your structure can withstand winter’s challenges, but even the most robust sauna requires seasonal care.
In this guide, you’ll discover how to thoroughly assess your sauna’s condition, implement proper cleaning protocols, apply protective sealants, prepare your heating system, and adopt safe winter usage practices. Following these recommendations will not only extend your sauna’s longevity but also enhance your winter sauna experiences when the contrast between frigid outdoor temperatures and the enveloping warmth inside creates the most authentic and invigorating sessions.
Assessing your sauna's condition before winter
Before winter arrives with its full force, conducting a comprehensive inspection of your outdoor sauna is crucial. This pre-season assessment helps identify potential issues that could worsen during freezing temperatures and heavy snow loads. Early detection allows for repairs under favorable conditions rather than emergency fixes during harsh weather.
What to inspect and why it matters
Exterior examination: Begin by carefully inspecting the exterior wood surfaces for signs of damage.

Look for cracks in the wood, especially around joints and seams where moisture can penetrate. Check for gaps that may have developed between wood planks due to seasonal expansion and contraction. Examine the roof structure for any weaknesses or sagging that might fail under snow weight. Windows and door seals deserve special attention as they’re common entry points for moisture and cold air.
Interior assessment: Inside your sauna, inspect benches for stability and signs of deterioration. Loose benches can pose safety hazards, particularly when stepping in from snowy conditions. Examine flooring for water damage or rot, which indicates drainage issues. Look for mold or mildew in corners and along ceiling edges, signs that ventilation may be inadequate. Any musty odor suggests hidden moisture problems that require attention before winter humidity exacerbates them.
Mechanical systems review: Your sauna heater requires thorough inspection regardless of type. For electric models, examine all visible wiring for fraying, corrosion, or rodent damage. Wood-burning stoves need chimney inspection, door gasket examination, and firebox assessment. Check that vents operate properly, as proper airflow prevents dangerous carbon monoxide buildup and reduces interior condensation. Confirm that temperature controls function accurately to prevent overheating during winter use.
If your inspection reveals significant damage like substantial wood rot, electrical issues, or structural weaknesses, consulting with professional sauna technicians is strongly recommended. These experts can identify hidden problems and perform repairs that ensure both safety and longevity. Thinking of upgrading to a winter-ready sauna kit? Explore our comprehensive DIY sauna guide to learn more about options designed to withstand harsh weather conditions.
If your inspection reveals significant damage like substantial wood rot, electrical issues, or structural weaknesses, consulting with professional sauna technicians is strongly recommended. These experts can identify hidden problems and perform repairs that ensure both safety and longevity. Thinking of upgrading to a winter-ready sauna kit? Explore our comprehensive DIY sauna guide to learn more about options designed to withstand harsh weather conditions.
Cleaning and prepping the sauna for cold weather
A thorough autumn cleaning forms the foundation of effective winter preparation, removing contaminants that could cause deterioration during freezing conditions and ensuring healthy air quality during winter sessions.
Interior cleaning protocol: Begin by removing all accessories and thoroughly sweeping all surfaces. Using a sauna-specific cleanser (or mild solution of water and vinegar), scrub benches, walls, and floors to remove body oils, skin cells, and bacteria. Pay special attention to bench undersides and corners where moisture can accumulate. Rinse surfaces with clean water, then allow them to dry completely with doors and vents open. This drying period is critical before winter as trapped moisture can freeze and expand, potentially causing wood damage.

Exterior maintenance: Remove all debris from the exterior surfaces, including leaves, twigs, and dirt. These materials trap moisture against wood and accelerate deterioration when frozen. Brush snow accumulation zones like the roof and area surrounding the foundation. If applicable, clear gutters and drainage channels to prevent ice dams. Wash exterior walls with appropriate wood-friendly cleaners to remove mold, mildew, and organic matter that can eat into protective finishes.
Surrounding area preparation: Trim overhanging branches that could break under snow weight and damage your structure. Remove combustible materials stored near wood-burning saunas. Create drainage channels to direct snowmelt away from the foundation. Establish a winter pathway with proper materials to prevent trips and falls when accessing your sauna in snowy or icy conditions.
Moisture control represents the most critical aspect of winter sauna preparation. After cleaning, ensure the structure dries completely before closing it up. Install a small dehumidifier or moisture-absorbing products for periods when the sauna remains unused. Following post-winter cleaning steps from a comprehensive DIY sauna guide can also apply before winter, as both seasons require similar attention to moisture management.
Sealing, covering, and insulating for maximum protection
Creating effective barriers against winter’s moisture and cold significantly extends your sauna’s lifespan while improving energy efficiency during operation.
Wood protection essentials: Apply sauna-safe sealant to exterior wood surfaces before winter’s first frost. Select products specifically formulated for sauna use, as standard wood sealants may release toxic fumes when heated. Focus on applying sealant to areas most exposed to snow and ice accumulation, including the roof, door frames, and window surrounds. For cedar saunas, use penetrating oils designed for cedar preservation that maintain the wood’s natural moisture-regulating properties while enhancing water resistance.
Strategic insulation upgrades: Inspect existing insulation for compression or moisture damage, replacing as needed. Add extra insulation to northern-facing walls that receive the brunt of winter winds. Install weatherstripping around doors and windows where gaps have developed. Consider temporary window insulation kits for additional protection during extremely cold periods. For barrel saunas, check band tension and adjust accordingly, as wood contraction during cold periods may loosen critical structural elements.
Protective coverings: When not in regular use, cover your sauna with a breathable, waterproof tarp secured against wind. For regularly used saunas, implement a partial covering system that protects the roof and northern exposure while allowing easy access. Create a snow-removal plan for heavy accumulation, using proper plastic tools that won’t damage wood surfaces. Consider installing small awnings above doors and windows to prevent ice formation at critical junctures.
Proper material selection plays a crucial role in winter protection. Traditional cedar construction offers natural advantages, including dimensional stability during temperature fluctuations and inherent resistance to moisture damage. Whatever your sauna’s construction material, understanding its specific winter vulnerabilities allows for targeted protection. To upgrade your sauna’s weather resistance, explore traditional vs. infrared sauna options for your climate if you’re considering replacement or significant renovation.
Caring for the sauna heater and interior components in winter
Your heating system requires specific winter preparation to ensure safety, efficiency, and reliability during the season when performance matters most.
Electric heater preparation: Schedule professional inspection of electrical components before winter. Clean all vents, element surfaces, and housings to remove dust that could burn when heated. Check thermostat accuracy using a separate thermometer, calibrating if necessary. Inspect all wiring for rodent damage, as these pests often seek winter shelter in warm spaces. Consider installing a surge protector if winter power fluctuations occur in your area. For unused periods, cover the heater with breathable material to prevent dust accumulation while allowing air circulation.
Wood-burning heater maintenance: Thoroughly clean the firebox, removing all ash and creosote buildup. Inspect the chimney and clean if necessary, as winter drafting changes can affect smoke evacuation. Check door gaskets for proper sealing and replace if worn. Obtain and properly store sufficient dry firewood, keeping a small amount inside the sauna room to use as starter wood. Consider a chimney cap if not already installed to prevent snow and wildlife entry.
Interior fixtures and accessories: Inspect sauna rocks for cracks or deterioration, replacing damaged stones that could break during heating cycles. Clean rocks thoroughly to remove mineral deposits that affect heat distribution. Remove and store moisture-sensitive accessories in climate-controlled environments. Apply food-grade mineral oil to wooden accessories like headrests and bucket handles to prevent drying and cracking. Consider adding winter-specific accessories like sauna thermometers with higher range accuracy in extreme conditions.
Maintaining optimal humidity becomes particularly challenging during winter when outdoor air contains less moisture. Keep a dedicated winter bucket and ladle for water application to heated rocks, using less water initially as the sauna heats to prevent excessive condensation on cold surfaces. In extremely cold conditions, consider pre-warming water before creating steam to reduce thermal shock to heated rocks and interior wood surfaces.
Using your outdoor sauna during winter: best practices and safety
Winter sauna sessions offer exceptional therapeutic benefits but require additional precautions to ensure safety and enjoyment.
Safe access creation: Establish and maintain a well-defined path from your home to the sauna, cleared of snow and ice after each storm.

Apply pet-friendly ice melt products to prevent slipping hazards. Install motion-activated lighting along the path for safe evening use. Create a covered transition area near the sauna entrance where you can remove snowy footwear without tracking moisture inside or exposing bare feet to snow.
Optimal operation procedures: Allow additional pre-heating time during extreme cold, as your sauna will require more energy to reach desired temperatures. Monitor humidity carefully, as winter air’s dryness can lead to uncomfortably low moisture levels inside the sauna. Implement a gradual heating approach rather than immediately setting maximum temperature, allowing the structure to warm evenly and reduce condensation formation. Ventilate briefly between sessions if hosting multiple users to remove excess humidity that could condense and freeze in wood pores.
Winter session modifications: Adjust typical sauna routines for winter conditions, including shorter cooling periods between heat sessions. Create a protected cool-down area that shields users from extreme temperature transitions. Keep hydration liquids in insulated containers to prevent freezing. Consider adding aromatherapy elements specifically chosen for winter wellness, such as eucalyptus or pine essences that support respiratory health during cold and flu season.
Health considerations take on added importance during winter sauna use. The dramatic temperature differential between the sauna interior and winter air requires cardiovascular adaptation. Begin with shorter sessions until your body acclimatizes to these transitions. Ensure proper hydration before, during, and after sauna use, as winter’s dry air compounds fluid loss through perspiration. See our expert guidance on choosing the right backyard sauna for your climate for even more year-round comfort options specifically designed for extreme temperature regions.
Preventing and addressing winter-specific sauna problems
Winter introduces unique challenges for outdoor saunas that require specialized prevention and response strategies.
Condensation management: Excessive moisture accumulation represents winter’s primary threat to sauna integrity. Install a small exhaust fan that operates post-session to remove humid air before it can condense and freeze within wood fibers. After each use, leave the door slightly ajar with a small heater running at low temperature to drive out residual moisture. For infrequently used saunas, place moisture-absorbing products inside during inactive periods, checking and replacing them monthly.
Freeze protection protocols: If your sauna includes plumbing, implement comprehensive freeze protection measures. Drain water lines completely when temperatures approach freezing if the sauna will remain unused for extended periods. Install pipe insulation on all water lines, paying special attention to exterior walls and unheated spaces. For advanced protection, consider heat tape installation on vulnerable pipe sections, connected to a temperature-activated switch.
Snow load management: Monitor roof accumulation during heavy snowfall events, removing excess before weight causes structural stress. Use proper snow-removal tools designed for wood structures rather than metal shovels that could damage surfaces. Create a snow-removal schedule based on your region’s typical accumulation patterns, with more frequent clearing for flat-roofed designs than pitched structures. Install snow guards if appropriate for your roof design to prevent dangerous snow slides near entrance areas.
Emergency preparedness becomes particularly important for winter sauna use. Create a winter emergency kit including a fully charged phone, basic first aid supplies, emergency blankets, and chemical hand warmers. Establish communication protocols so household members know your sauna session schedule. Consider installing a simple alarm or notification system that can alert the main house in case of emergency during winter sessions when outdoor sounds are naturally muffled by snow.
Creating the perfect winter sauna experience
Beyond basic maintenance, thoughtful enhancements can transform winter sauna sessions into extraordinary experiences that maximize the season’s unique qualities.
Sensory optimizations: Position seating to take advantage of winter views through windows if your design permits. Install dimmable lighting that complements the golden glow of sunset during early evening winter sessions. Consider adding sauna-safe audio options for enjoying music or meditation recordings that complement the winter atmosphere. Incorporate winter-specific aromatherapy using essential oils designed for respiratory support and mental wellness during the darker months.
Tradition integration: Explore and incorporate winter sauna traditions from cultures with extensive cold-weather sauna heritage. Adapt Finnish practices like winter swimming (in safe, controlled environments) or snow-rolling between heat sessions. Create your own seasonal rituals that mark winter solstice or celebrate the new year with cleansing sauna ceremonies. Document your winter sauna experiences through journaling or photography to develop personal traditions that enhance connection to the seasons.
Comfort enhancements: Stock your changing area with plush, quick-drying towels designated specifically for winter use. Install hooks for drying winter garments during your session. Create a beverage station with insulated containers for hot tea or cold water that remains at proper temperature throughout your session. Consider adding sauna-safe footrests that elevate feet from potentially cold flooring during the initial heating phase.
Many sauna enthusiasts discover that winter provides their most profound experiences, as the contrast between interior warmth and exterior cold creates heightened awareness and intensified benefits. The practice of maintaining and using a sauna through winter connects users to ancient traditions of finding warmth, community, and wellness during the coldest months, turning the challenges of winter into opportunities for deeper enjoyment of your outdoor sauna.
Conclusion
Preparing your outdoor sauna for winter represents an investment in both the structure’s longevity and your continued wellness throughout the coldest months. The comprehensive approach outlined—from thorough inspection and cleaning to specialized protection measures and operational adaptations—creates a foundation for trouble-free winter enjoyment while protecting your valuable outdoor wellness space.
The contrast between winter’s chill and your sauna’s embracing warmth delivers uniquely beneficial experiences unavailable in other seasons. With proper preparation, your outdoor sauna transforms from a fair-weather amenity into a year-round sanctuary that actually becomes more valuable during winter’s coldest days. The traditional practice of winter sauna use connects you to centuries of wisdom about maintaining physical and mental wellness through seasonal extremes.
Begin your winterization process well before the first significant snowfall or freeze, ideally during late autumn when temperatures remain moderate enough for effective cleaning and sealing. Establish a winter maintenance schedule that includes regular snow removal, moisture monitoring, and system checks. By approaching winter sauna care proactively rather than reactively, you’ll ensure uninterrupted enjoyment while extending your sauna’s functional lifespan for many winters to come.
Frequently asked questions (FAQ)
Can I use my outdoor sauna during snowstorms?
Yes, provided access paths are safe and cleared, and you follow basic safety and heating guidelines. Ensure proper ventilation, monitor the roof for excessive snow accumulation during the session, and have a communication plan with someone indoors.
What type of sealant is best for an outdoor sauna?
Use a high-quality, sauna-approved wood sealant that is moisture- and UV-resistant. Look for products specifically labeled as sauna-safe to ensure they won’t release harmful chemicals when heated, preferably with natural oils for cedar surfaces.
Should I cover my sauna if using it in winter?
Yes, use a protective cover or tarp when not in use to prevent snow accumulation, but safely remove it before heating. Choose breathable materials that prevent moisture buildup and secure coverings properly to withstand winter winds.
How often should I clean my sauna in winter?
Clean after every few uses and check for moisture or debris—weekly is a good minimum in cold weather. Pay particular attention to benches and floor areas where melting snow from footwear or bodies might introduce excess moisture.
What precautions should I take with the sauna heater in winter?
Inspect and clean the heater regularly, and ensure all wiring and connections are dry and secure before use. Allow additional warm-up time during extreme cold, and never leave combustible materials near wood-burning heaters when operating in winter conditions.